A High Quality Antique Line Engraving of "From the Field of Sedgemoor" (The Battle of Sedgemoor 1685).
Engraver: Charles Oliver Murray (British, 1842-1923).
Artist: from the original work by John Seymour Lucas RA (British, 1849 – 1923)
Size: 32x23,1 cms.
Production date: in London circa 1875.
Media/Technique: A High Quality Antique Line Engraving
Condition: minor foxing and minor imperfection in left margin due to handling.
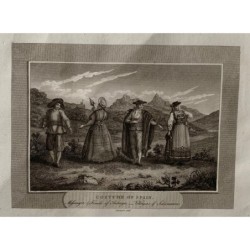
Description: A High Quality Antique Line Engraving of "From the Field of Sedgemoor" (The Battle of Sedgemoor 1685). In the Collection of William Knowles Esq.
In this image, a young man who has fled the battlefield, is sheltering in a nearby cottage. The young lady is listening out for possible pursuers. The Battle of Sedgemoor was fought on 6 July 1685 and took place near Bridgwater in Somerset, England.It was the final battle of the Monmouth Rebellion and followed a series of skirmishes around south west England between the forces of James Scott, 1st Duke of Monmouth and the crown he was trying to take. The royalist forces prevailed and about 500 troops were captured. Monmouth escaped from the battlefield but was later captured and taken to London for trial and execution.Many of Monmouth's supporters were tried during the Bloody Assizes. Many were transported abroad, while others were executed by drawing and quartering.It was the final battle of the Monmouth Rebellion between the troops of the rebel James Scott, 1st Duke of Monmouth who was attempting to seize the English throne from his uncle James II of England. James II had succeeded to the throne on the death of his brother Charles II on 2 February 1685; James Scott was Charles' illegitimate son.After Monmouth landed from the Netherlands at Lyme Regis in Dorset, there had been a series of marches and skirmishes throughout Dorset and Somerset. Eventually Monmouth's poorly equipped army was pushed back to the Somerset Levels, becoming hemmed in at Bridgwater on 3 July, and ordered his troops to fortify the town. The force was made up of around 3,500, mostly nonconformist, artisans and farmer workers armed with farm tools (such as pitchforks):The royalist troops led by Louis de Duras, 2nd Earl of Feversham and Colonel John Churchill. The infantry forces included 500 men of the 1st Regiment of Foot (Royal Scots), two battalions of the 1st or King's Royal Regiment of Guard's (Grenadier Guards) led by Henry FitzRoy, 1st Duke of Grafton, 600 men of the Second Regiment of Guards and five companies of the Queen Consort's Regiment (Kings Own Royal Border Regiment). The Horse and Foot, the Royal Train of Artillery was camped along the road to Bridgwater. The Royal Cavalry, with seven troops, 420 men of the Earl of Oxfords, the Kings Regiment of Horse (Blues and Royals), the King's Own Royal Dragoons and three troops of the King's Horse Guards (Lifeguards) made up the army. The Battle The Duke eventually led his untrained and ill-equipped troops out of Bridgwater at around 10:00 pm to undertake a night-time attack on the King's army. They were guided by Richard Godfrey, the servant of a local farmer, along the old Bristol road towards Bawdrip. With their limited cavalry in the vanguard they turned south along Bradney Lane and Marsh Lane, and came to the open moor with its deep and dangerous rhynes.There was a delay while the rhyne was crossed and the first men across startled a royalist patrol. A shot was fired and a horseman from the patrol galloped off to report to Feversham. Lord Grey of Warke led the rebel cavalry forward and they were engaged by the King's Regiment of Horse which alerted the rest of the royalist forces. The superior training of the regular army and their horses routed the rebel forces by outflanking them.
, c.1875")
, c.1875")